Theme NexT works best with JavaScript enabled

Hexo-ytliangc

愿有岁月可回首,且以深情共白头

0%

docker-compose安装Hadoop+hive+MySQL

首先特别感谢参考的博客,感谢作者Victor_python是你指明了我探索的道路,让我能顺利完成本博客的内容。参考连接:docker下安装hive 2.3.4

==============================================================

本博客使用软件信息如下

Hadoop: v2.7.3

hive: v2.3.7

mysql: v5.7

mysql-connector-java: v5.1.49

Hadoop和hive的安装包可以到官方地址下载,也可以到国内的清华源或者阿里云的镜像站下载

mysql-connector-java下载地址: mysql-connector-java

如果上述地址无法下载,也可以到我的百度网盘下载

连接地址 提取码
百度网盘连接 nv7j

首先确保docker安装、启动成功

1
2
$ docker -v
Docker version 19.03.8, build afacb8b

安装dockc-ompose

1
2
3
4
5
6
$ curl -L https://get.daocloud.io/docker/compose/releases/download/1.25.0/docker-compose-`uname -s`-`uname -m` > /usr/local/bin/docker-compose

$ sudo chmod +x /usr/local/bin/docker-compose

$ docker-compose -v
docker-compose version 1.25.0, build 0a186604

准备相关文件,内容如下

1
2
3
4
5
6
7
8
9
10
11
12
13
14
15
16
17
18
[root@master-dev opt]# mkdir /opt/hadoop && cd /opt
[root@master-dev opt]# tree -L 2 hadoop/
hadoop/
├── apache-hive-2.3.7-bin.tar.gz #hive安装包
├── docker-compose.yaml
├── Dockerfile
├── hadoop-2.7.3.tar.gz #hadoop安装包
├── mysql-connector-java-5.1.49.jar #hive连接mysql使用的jdbc
├── run.sh
└── src #hadoop和hive的配置文件
├── core-site.xml
├── hadoop-env.sh
├── hdfs-site.xml
├── hive-site.xml
├── mapred-site.xml
└── profile

3 directories, 19 files

/opt/hadoop下面新建run.sh

1
2
3
4
5
6
7
8
9
10
11
$ cat run.sh
#!/bin/bash
/usr/sbin/sshd -D
#以下内容需要等容器启动后进去容器执行
#启动Hadoop
#source /etc/profile && hadoop namenode -format
#start-dfs.sh && start-yarn.sh
#启动hive链接mysql数据库
#schematool -initSchema -dbType mysql
#启动HiveServer
#nohup hiveserver2 &

/opt/hadoop下面新建Dockerfile

1
2
3
4
5
6
7
8
9
10
11
12
13
14
15
16
17
18
19
20
21
22
23
24
25
26
27
28
29
30
31
32
33
34
35
36
37
38
39
40
41
42
43
44
45
46
47
48
49
50
51
52
53
54
55
56
57
58
59
60
61
62
# 生成的镜像以centos镜像为基础
FROM centos
MAINTAINER by ytliangc
#升级系统
RUN yum -y update
#安装openssh-server、client
RUN yum -y install openssh-server openssh-clients.x86_64 vim less wget
#修改/etc/ssh/sshd_config
#RUN sed -i 's/UsePAM yes/UsePAM no/g' /etc/ssh/sshd_config
#将密钥文件复制到/etc/ssh/目录中。这里要用root的权限生成key
RUN mkdir -p /root/.ssh
#生成秘钥、公钥
RUN ssh-keygen -t rsa -b 2048 -P '' -f /root/.ssh/id_rsa
RUN cat /root/.ssh/id_rsa.pub > /root/.ssh/authorized_keys
RUN cp /root/.ssh/id_rsa /etc/ssh/ssh_host_rsa_key
RUN cp /root/.ssh/id_rsa.pub /etc/ssh/ssh_host_rsa_key.pub

# 安装 jre 1.8
RUN yum -y install java-1.8.0-openjdk.x86_64
ENV JAVA_HOME=/etc/alternatives/jre_1.8.0

#定义时区参数
ENV TZ=Asia/Shanghai
#设置时区
RUN ln -snf /usr/share/zoneinfo/$TZ /etc/localtime && echo '$TZ' > /etc/timezone

#将ssh服务启动脚本复制到/usr/local/sbin目录中,并改变权限为755
ADD run.sh /usr/local/sbin/run.sh
RUN chmod 755 /usr/local/sbin/run.sh

#拷贝hadoop和hive安装包
ADD hadoop-2.7.3.tar.gz /usr/local
ADD apache-hive-2.3.7-bin.tar.gz /usr/local
ADD mysql-connector-java-5.1.49.jar /usr/local/apache-hive-2.3.7-bin/lib/

RUN echo "export HADOOP_HOME="/usr/local/hadoop-2.7.3"" >> /etc/profile \
&& echo "export PATH=$PATH:$HADOOP_HOME/bin:$HADOOP_HOME/sbin " >> /etc/profile \
&& echo "export HIVE_HOME="/usr/local/apache-hive-2.3.7-bin" " >> /etc/profile \
&& echo "export PATH=$PATH:$HADOOP_HOME/bin:$HADOOP_HOME/sbin:$HIVE_HOME/bin" >> /etc/profile \
&& rm -rf /etc/profile

COPY ["src/core-site.xml","/usr/local/hadoop-2.7.3/etc/hadoop/"]
COPY ["src/hdfs-site.xml","/usr/local/hadoop-2.7.3/etc/hadoop/"]
COPY ["src/mapred-site.xml","/usr/local/hadoop-2.7.3/etc/hadoop/"]
COPY ["src/hive-site.xml","/usr/local/apache-hive-2.3.7-bin/conf"]
COPY ["src/hadoop-env.sh","/usr/local/hadoop-2.7.3/etc/hadoop/"]
COPY ["src/profile","/etc/profile"]

RUN source /etc/profile

#变更root密码为root
RUN echo "root:root"| chpasswd
#开放窗口的22端口 根据自己的需求来增加或删除
EXPOSE 22
EXPOSE 8080
EXPOSE 9000
EXPOSE 50070
EXPOSE 10000
EXPOSE 8088
EXPOSE 10002
#运行脚本,启动sshd服务
CMD ["/usr/local/sbin/run.sh"]

/opt/hadoop下面新建docker-compose.yaml

1
2
3
4
5
6
7
8
9
10
11
12
13
14
15
16
17
18
19
20
21
22
23
24
25
version: "2"
services:
mysqldb:
image: registry.cn-hangzhou.aliyuncs.com/public_ns/mysql:5.7
container_name: mysql
restart: always
ports:
- "3306:3306"
mem_limit: 2048M
environment:
- MYSQL_ROOT_PASSWORD=123456
volumes:
- /data/docker-data/mysql-data/mysql/:/var/lib/mysql/
- /etc/localtime:/etc/localtime
myhadoop:
image: my_centos:v1
container_name: hadoop
ports:
- "32802:22"
- "32801:8080"
- "32800:8088"
- "32799:9000"
- "32798:10000"
- "32797:10002"
- "32796:50070"

注意:这里在启动docker-compose之前需要给MySQL创建一个存储的空目录!!!

src下面的文件存放在GitHub上,链接地址:Github地址

准备基础镜像

1
2
3
4
5
6
#在/opt/hadoop目录下执行
$ docker build -t docker build -t my_centos:v1 .

$ docker-compose up -d
Starting mysql ... done
Starting hadoop ... done

1、在数据库启动后,我们还需要链接到数据新建一个名为hive的数据库,给hive使用

1
2
3
4
5
6
7
8
9
10
11
12
13
14
15
16
17
[root@vmlabmaster-dev hadoop]# docker exec -it mysql bash
root@a030f58f915d:/# mysql -uroot -p
Enter password:
Welcome to the MySQL monitor. Commands end with ; or \g.
Your MySQL connection id is 2
Server version: 5.7.30 MySQL Community Server (GPL)

Copyright (c) 2000, 2020, Oracle and/or its affiliates. All rights reserved.

Oracle is a registered trademark of Oracle Corporation and/or its
affiliates. Other names may be trademarks of their respective
owners.

Type 'help;' or '\h' for help. Type '\c' to clear the current input statement.

mysql> create database hive;
Query OK, 1 row affected (0.00 sec)

2、修改数据库连接信息,需要把mysql修改为hive

image-20200712113911069.png

启动Hadoop和hive

1
2
3
4
5
6
7
8
9
10
11
12
13
14
15
16
17
18
19
20
21
22
23
24
25
26
27
28
29
30
31
32
33
34
35
36
37
38
39
$ docker exec -it hadoop bash

[root@73326baf0f61 /]# source /etc/profile && hadoop namenode -format

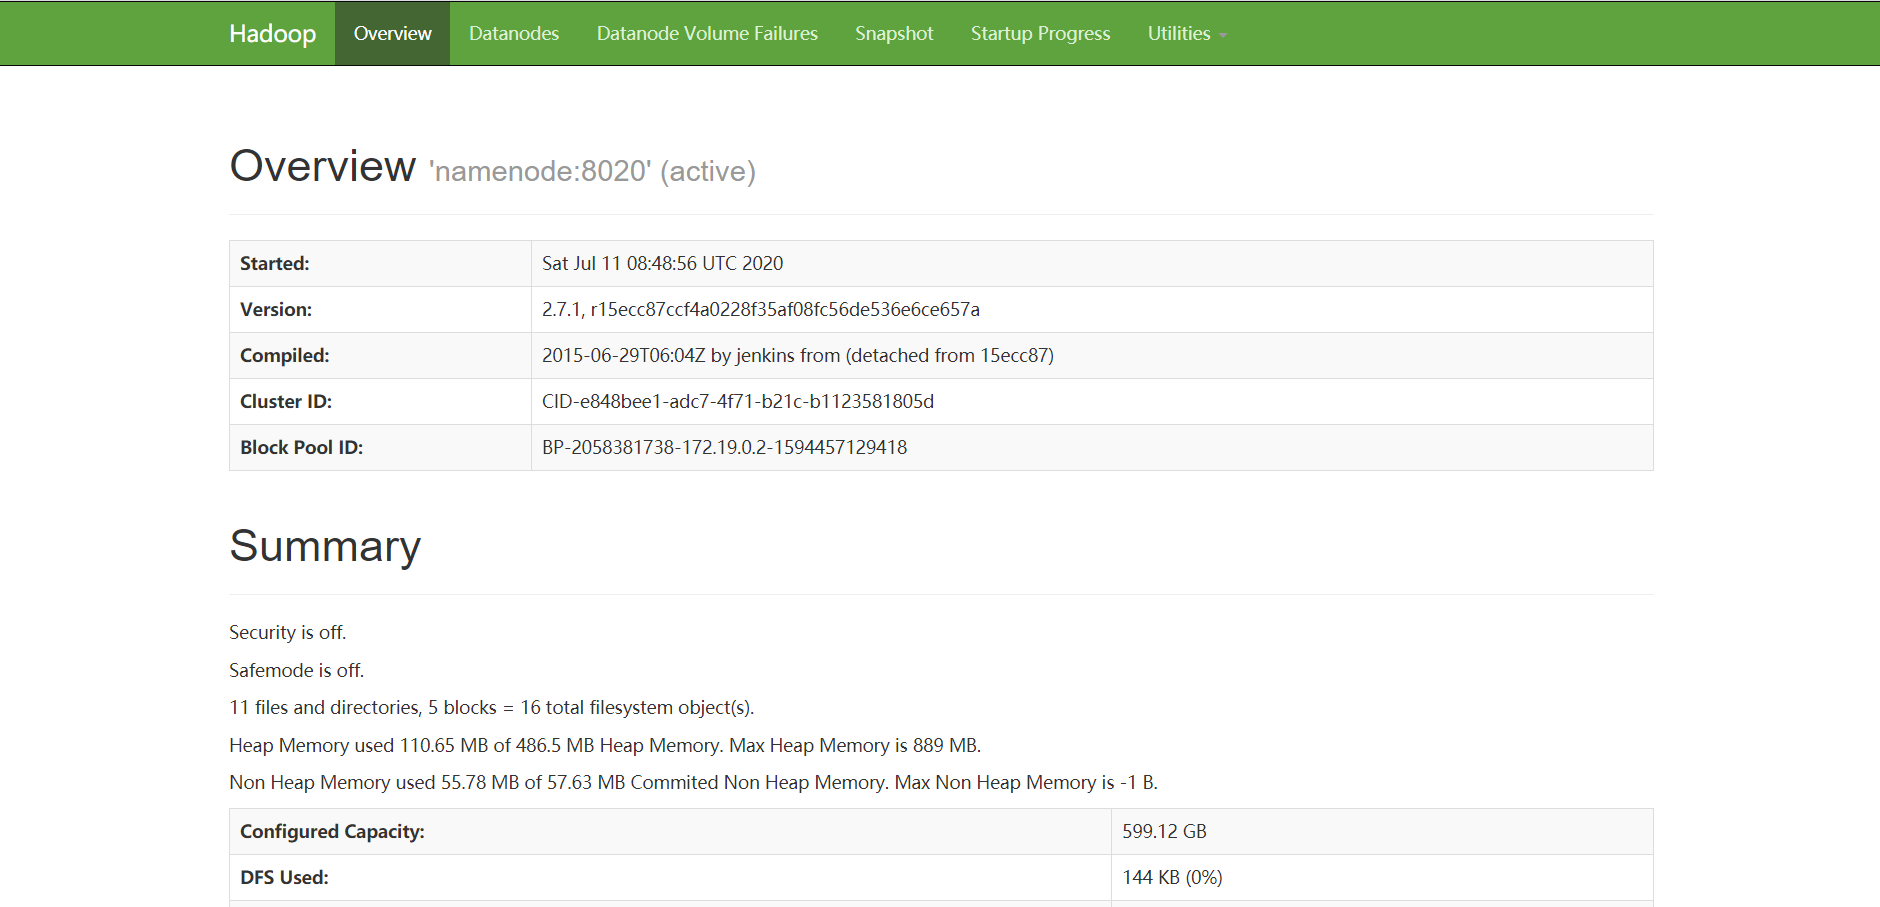
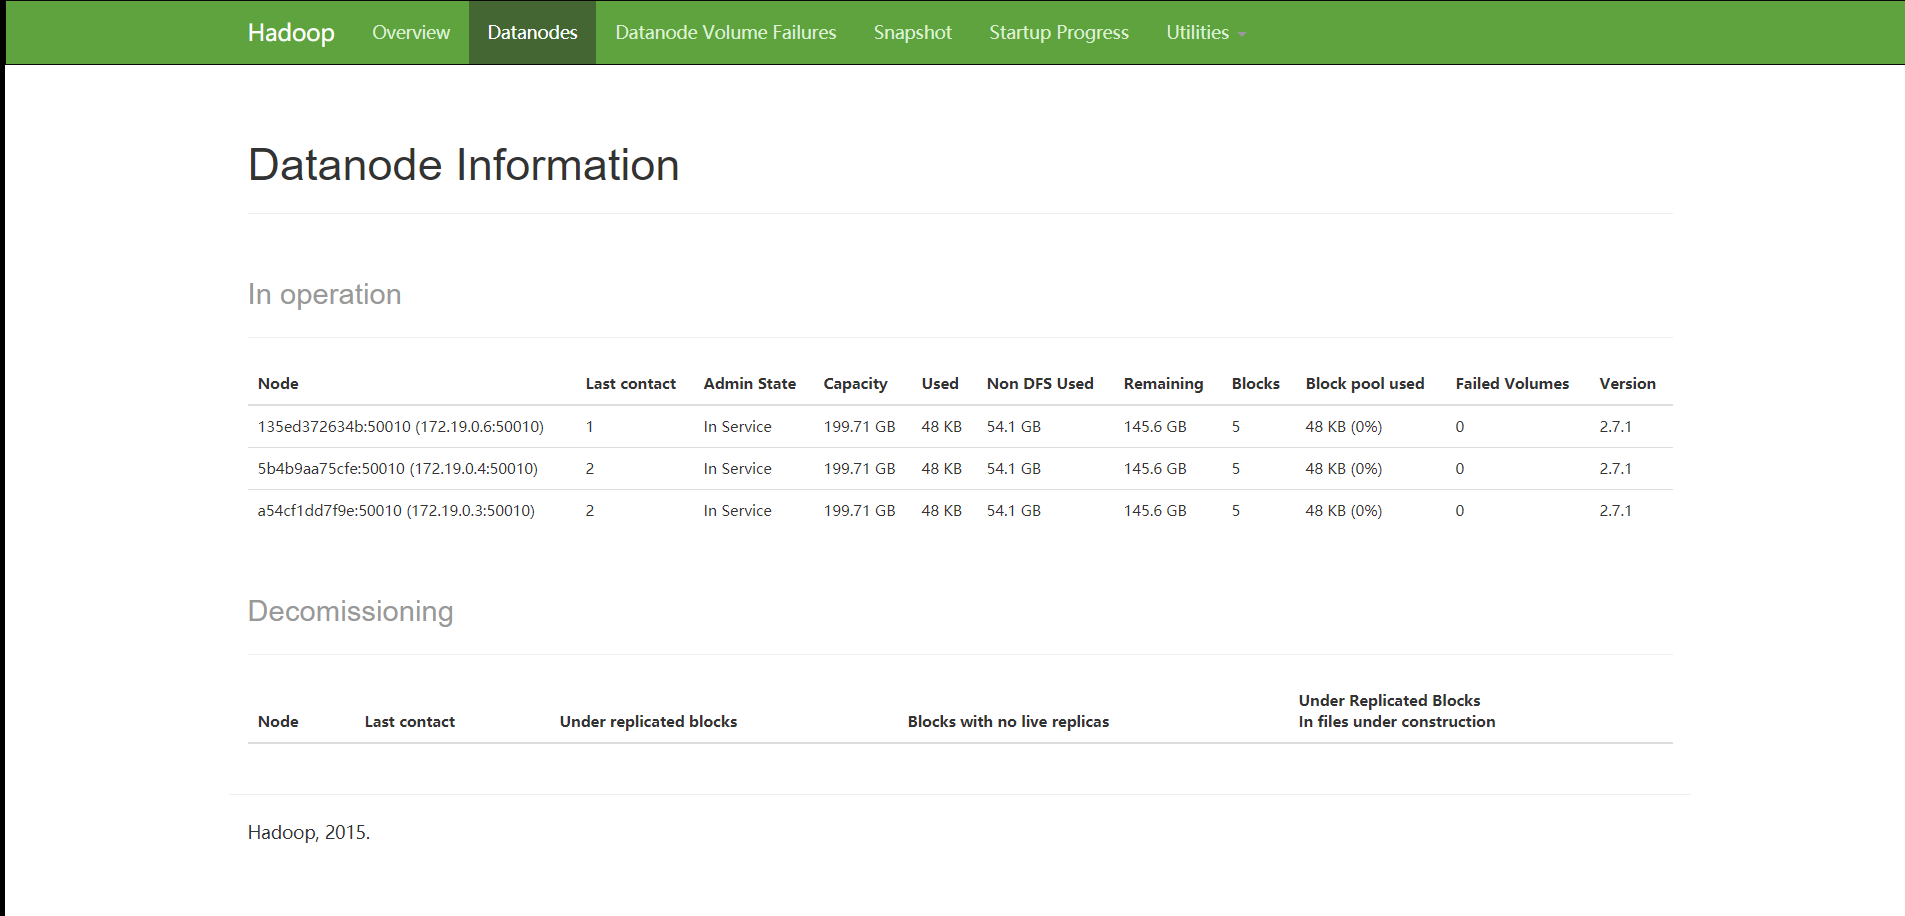
#出现提示的话,输入yes即可
[root@73326baf0f61 /]# start-dfs.sh && start-yarn.sh
Starting namenodes on [localhost]
The authenticity of host 'localhost (127.0.0.1)' can't be established.
RSA key fingerprint is SHA256:Aog6oB0HvbmXPR1AyYfPBJ//tcDNp8i3kr5QGzrkQHg.
Are you sure you want to continue connecting (yes/no/[fingerprint])? yes
localhost: Warning: Permanently added 'localhost' (RSA) to the list of known hosts.
localhost: starting namenode, logging to /usr/local/hadoop-2.7.3/logs/hadoop-root-namenode-73326baf0f61.out
localhost: starting datanode, logging to /usr/local/hadoop-2.7.3/logs/hadoop-root-datanode-73326baf0f61.out
Starting secondary namenodes [0.0.0.0]
The authenticity of host '0.0.0.0 (0.0.0.0)' can't be established.
RSA key fingerprint is SHA256:Aog6oB0HvbmXPR1AyYfPBJ//tcDNp8i3kr5QGzrkQHg.
Are you sure you want to continue connecting (yes/no/[fingerprint])? yes
0.0.0.0: Warning: Permanently added '0.0.0.0' (RSA) to the list of known hosts.
0.0.0.0: starting secondarynamenode, logging to /usr/local/hadoop-2.7.3/logs/hadoop-root-secondarynamenode-73326baf0f61.out
starting yarn daemons
starting resourcemanager, logging to /usr/local/hadoop-2.7.3/logs/yarn-root-resourcemanager-73326baf0f61.out
localhost: starting nodemanager, logging to /usr/local/hadoop-2.7.3/logs/yarn-root-nodemanager-73326baf0f61.out


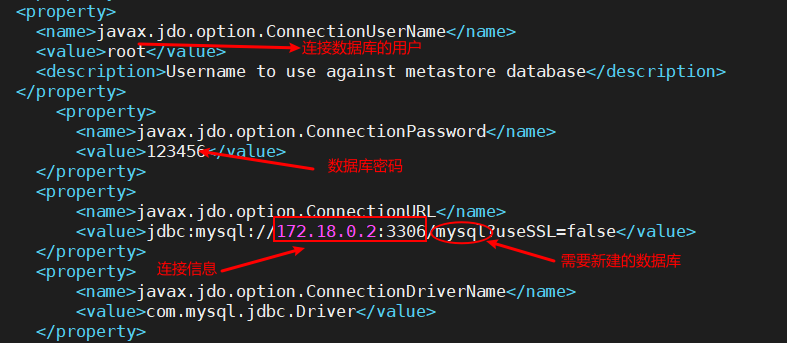
[root@73326baf0f61 /]# schematool -initSchema -dbType mysql
SLF4J: Class path contains multiple SLF4J bindings.
SLF4J: Found binding in [jar:file:/usr/local/apache-hive-2.3.7-bin/lib/log4j-slf4j-impl-2.6.2.jar!/org/slf4j/impl/StaticLoggerBinder.class]
SLF4J: Found binding in [jar:file:/usr/local/hadoop-2.7.3/share/hadoop/common/lib/slf4j-log4j12-1.7.10.jar!/org/slf4j/impl/StaticLoggerBinder.class]
SLF4J: See http://www.slf4j.org/codes.html#multiple_bindings for an explanation.
SLF4J: Actual binding is of type [org.apache.logging.slf4j.Log4jLoggerFactory]
Metastore connection URL: jdbc:mysql://172.18.0.2:3306/mysql?useSSL=false
Metastore Connection Driver : com.mysql.jdbc.Driver
Metastore connection User: root
Starting metastore schema initialization to 2.3.0
Initialization script hive-schema-2.3.0.mysql.sql
Initialization script completed
schemaTool completed

#出现schemaTool completed说明连接数据库成功

进行验证

访问 http://ip:50070

Snipaste_2020-07-12_11-45-52.png

Snipaste_2020-07-12_11-46-05.png

访问 http://ip:32797
Snipaste_2020-07-12_11-47-46.png

-------------本文结束感谢您的阅读-------------
坚持原创技术分享,您的支持将鼓励我继续创作!
ytlaingc 微信支付

微信支付

ytlaingc 支付宝

支付宝